Thursday 31 October 2013

Halloween

Another weekly project on Halloween. I didn't leave enough time on this project and this fact reflects in my submitted piece. These week I've been working overtime on our other, Games Mechanic project where we have to re-produce our Student Refectory in 3D.

Any way, to me, one of the most terrifying things would be a murder doll come to life. I produced a quick mood board just to familiarise myself with the idea I had in mind. I took a painting approach to this model because I didn't have enough time to develop a 3D model/scene.

Here is my mood board:

This is my final piece:


Wednesday 23 October 2013

Sci-fi Ship, Week 2

Following on from the previous week, I continued to build the Space Ship. The build was very successful, and I learnt a lot from it. (Always good).

I decided I wanted to push a few more details with this model, including wires, a more natural cloth (though somewhat stretched), and decent topology.

This spin around render is of my final build:


As previously mentioned, I learnt a few things from building this. I will cover a few of the important ones below.

Firstly, I learnt a bit more on how to use the line tool, and how this can be used to make wires. The only downside is that although you can change the number of polys going around the circumference of the wire, I couldn't seem to find a way to reduce the length segments. This meant I had to manually delete the ones that weren't needed.

Secondly, I explored how to use the cloth modifier. This was great to simulate gravity on a cloth. I had to do a lot of tweaking afterward to make it look more stretched. It was great to find out that 3DS Max has presets for different types of cloth too! So I was able to pick "Heavy Leather" and get good results out of the box.

Finally I learnt another lesson with topology. Originally my plan was to put this into zBrush to get some funky detail on there. Though once I put the model into zBrush, I discovered that an uneven polygon distribution meant uneven detail across the model. Though I did watch some tutorials on re-topologising a high poly model to low. I really want to give this a shot next assignment. I'll probably do the whole thing in zBrush and just fine tune the outcome in max.

To help get some more renders from my model, I researched how to add a decent wireframe to the model. This was done by assigning the Mental Ray renderer, and using a Composite material. 1 material with the base colour, and 1 material set to 'wireframe'. A very simple trick and produced the following images.


Once again I was unable to take the model to a finished piece, even though I worked on it a lot longer than the required out-of-class time. My aim for the next task is to get a high poly (lots of detail) model and get it turned into an efficient low poly model. Now that I've learnt what's required from a low poly model (by correcting a thousand mistakes), I think working backwards should be a lot easier.

Thursday 17 October 2013

Sci-fi Ship, Week 1

The current project has a two week span, and for the first week, I've concentrated on research and ideas.

For my project I've written a small bit of game lore to help set the scene for my ship. I felt this was important as it gave me a clearer idea on what I was designing.

Click Here to read the lore.

I then set out to research a load of useful images to help me with the design process. These images included textures, concept cars, current space ships, and other similar concept space ship art.

Because there are so many, I zipped them into a folder for you to see. Please note that all these images are found via various searches, I'm sure a quick google image search will allow you to find the original authors. I have merely used them for mood reference and I am not studying them specifically.

Click Here to download the reference images.

The following images are of some sketches I produced from the reference, whilst keeping the lore in mind.

This was the first batch of quick sketches I did to get an idea of y favourite designs.

I tried taking one design further, however I didn't really enjoy this in the end.

I loved this sort of semi-pod racer design, and I love the leather cover given it a more home-made feel.

I started designing smaller parts of the ship in more detail, I love the top left image here, as well as the modular design going on in the bottom image.

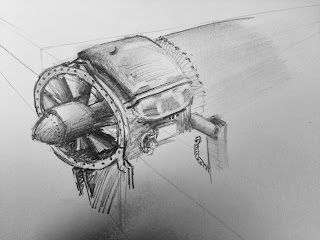
I felt the turbine needed a bit more work on so that I had more to refer back to when modelling in 3D.

Moving on from here this week will all be about the 3D. I plan to really have a crack at textures, and I will be investing in the photoshop plugings dDo and nDo allowing AAA standard texturing very quickly. I also want to try it in a game engine (probably unity) with different shaders employed into the scene. (Maybe a toon shader to try and get that Borderlands art style?)


Thursday 10 October 2013

Minotaur Tutorial

This week's task was to follow a tutorial that Glen Southern did on his youtube channel nevercenter.

I found it useful for picking up on edge loop management, and a few ways to kill tri's and ngons.

I also made this tutorial to help fellow class mates find nGons.


I finished part 3, and did not move on as he missed a huge chunk between part 3 and 4 where he added a load more geometry without discussing it.


Thursday 3 October 2013

Back to Uni! Week 1: World Building

So back to uni now and our first project was to develop a sea creature. We had the choice for our final piece to be in 2D or 3D. This year I want to push my 3D route and Environment building.

To begin with, like always I built a mood board. Just to see what other people have created, and common trends that makes them recognisable as an underwater creature.


I next started to quickly get some ideas down, exploring different looks of creatures to see what I saw was best fit.


I really liked the skull, and the idea of a hard shelled creature.


I had a quick attempt at modelling this however it didn't quite look very good at all.


So I went back to paper again to try and develop the idea and get more of an understanding of my creature.


Although I really liked the fish details, something still wasn't quite right. So I tried some other ideas again.


I liked the tail from the previous drawing so I incorporated that into my skull idea, and ended up with the drawing in the bottom left.


I created a blueprint of this design to model in 3DS Max.

Modelling this creature was fun, this is my result Base Mesh


I had to use this tail image as a reference for my creatures. The program XN Viewer was great to use as it allowed me to set the image to "Always on top" for quick reference checking.


Using a program called Roadkill, I unwrapped it very quick, with some final tweaks in 3DS Max.


My next step for this creature is to develop it further in zBrush, allowing me to create a more detailed (advanced) mesh. I'll probably then have to re-topologise my base mesh to fit, however then I can create more detailed texture maps (AO, Normals, Specular) to really make my creature come alive, and all in all look more realistic.